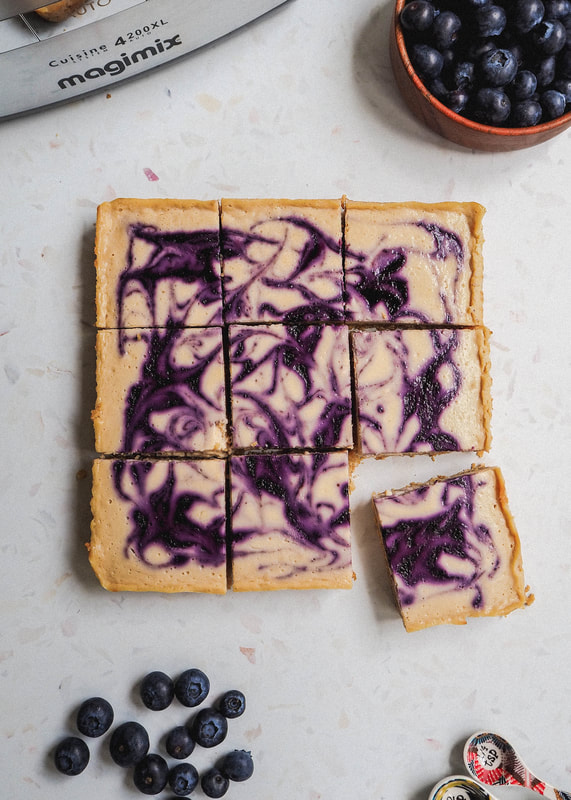
 Who says vegan can’t have cheesecake?! Today Vegan’s are rather lucky with the amount of alternatives on supermarket shelves and dairy free cream cheese is definitely not hard to find. In saying that I find these alternatives highly processed and probably not much better for you than the original, hence why I have my own cheesecake recipe here. My Blueberry Cheesecake Bars are dairy free, gluten free and made using wholefood ingredients that are more likely to put a spring in your step rather than slow you down. With the protein rich nature of the oats, almond meal, cashews and tofu, you could even consider this as a breakfast option or pre/post work out snack. Enjoy! Love Alex, Ballerina Bites. Xx PS: Be sure to tag me @ballerina_bites so I can see your wonderful recreations! 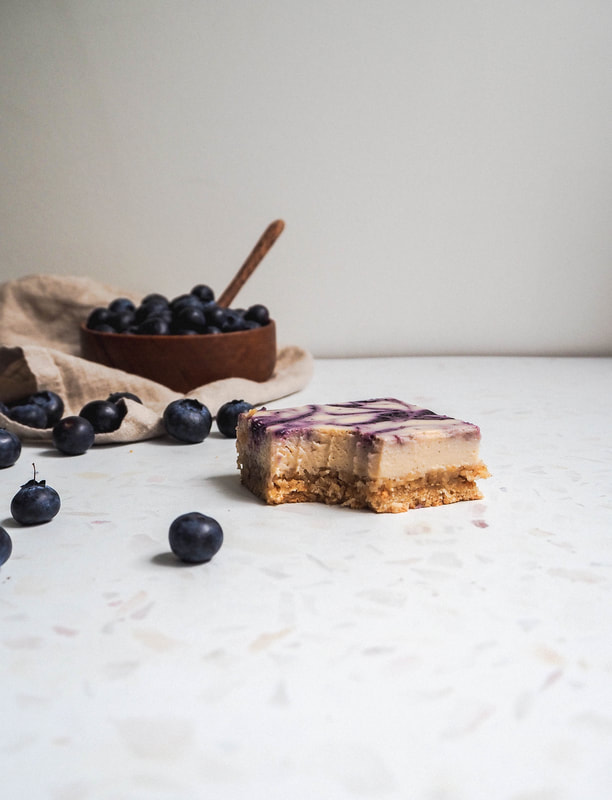 Ingredients Blueberry Jam 150g blueberries, fresh or frozen Base ¾ cup rolled oats 1 cup almond meal ¼ cup unsweetened desiccated coconut ¼ tsp fine table salt ¼ cup maple syrup Filling 300g silken tofu 1 tbsp tapioca flour ½ tsp nutritional yeast Zest of 1 small lemon Juice of 1 small lemon ⅓ cup maple syrup ¼ cup coconut oil, melted ½ tsp vanilla extract or ¼ tsp vanilla paste 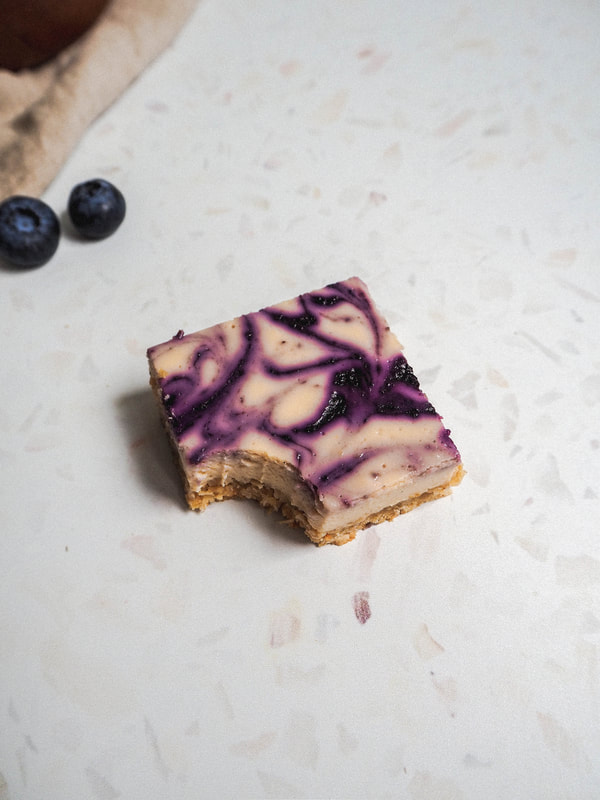 Method
Preheat the oven to 160°C fan. Line a 20cm square brownie tin with baking paper, leaving paper around the perimeter so the cheesecake can be easily removed once baked. Add the blueberries to your food processor and blend until smooth. Pour the blueberry smoothie into a small saucepan and set heat to low. Allow to bubble away while you prepare the base & filling steps. Once your jam is nicely thickened, (it will thicken even more once cooled) take off the heat and set aside until needed. To a food processor (wiped out from the previous step) add the rolled oats and blend until a flour. Add the remaining base ingredients and blend until a dough forms- you may need to scrape down the sides to ensure everything is nicely combined. Firmly press the dough into your lined brownie tin, using the back of a spoon - slightly wet the spoon to prevent sticking. Bake for 10- 15min, or until golden. Meanwhile, add all filling ingredients to your food processor (wiped out from the previous step) and blend until super smooth. Pour the cheesecake filling over the base and top and dollop with the blueberry jam. To make the swirl pattern, use a knife or preferably a chopstick, to lightly mix the jam and cheesecake filling together in spontaneous motions. Bake the cheesecake for 25-30 minutes, or until the edges are golden and begin to pull off the sides of the brownie tin. Once baked, allow to cool in the tin for 15min, before allowing to cool completely on a wire rack. Transfer the cheesecake to the fridge and refrigerate for a minimum of 5 hours or overnight. Once set, slice & enjoy! Yields 9 Bars
0 Comments
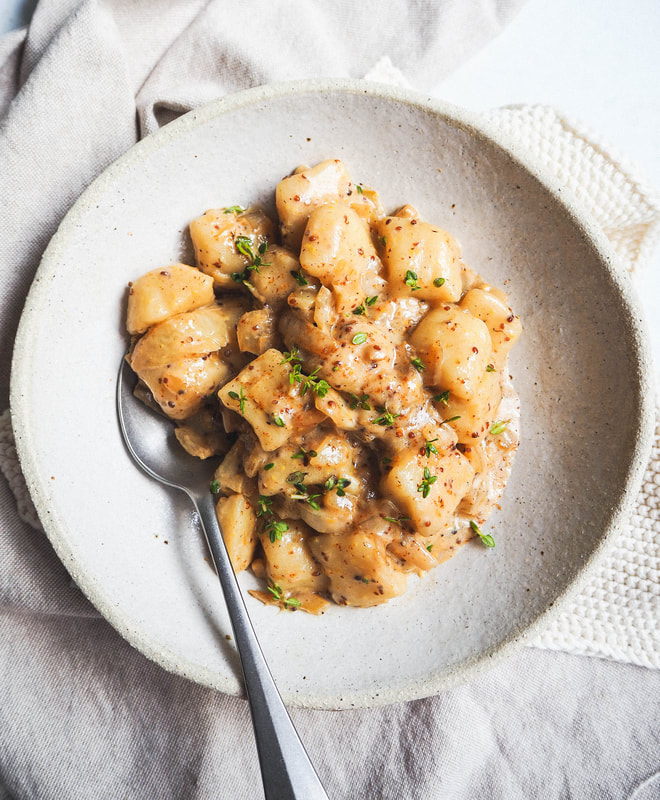 Anything pasta related I’m pretty much all over, and I can’t express how much I love it! My trip to Italy last year for my older brother’s wedding had me in my element, with no complaints of the excessive amount we were eating. When I go for a pasta dish, I love a simple arrabbiata (a chilli based tomato sauce), but as of late I’ve been experimenting with creamier based sauces- like last month's Smokey Pepper Pasta. Here I have a recipe that was inspired by Mum’s Mustard Chicken Pasta, which she used to make us growing up. Obviously there’s no chicken and I’ve replaced the heavy cream with coconut cream, but this recipe still compares, if not beats Mum’s. (Sorry Mum! <3) Enjoy! Love Alex, Ballerina Bites. Xx PS: Be sure to tag me @ballerina_bites so I can see your wonderful recreations! 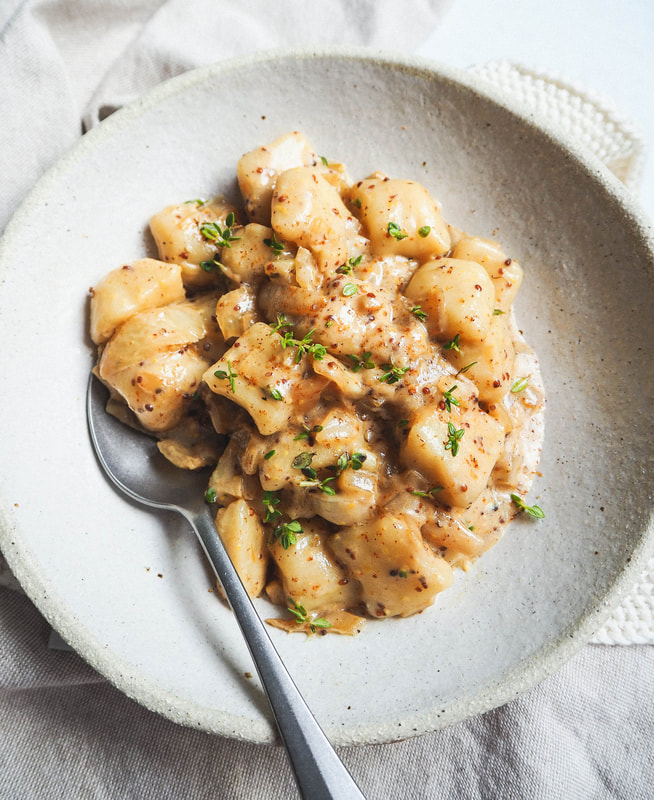 Ingredients 1 small onion, finely diced 4 garlic cloves, finely diced 2 tsp tamari or soy sauce 4 heaping tbsp coconut cream 2 heaping tsp seeded mustard ⅓ cup pasta water 2 tbsp nutritional yeast A generous pinch of cayenne pepper A generous pinch of nutmeg (preferably freshly grated) 2 tsp fresh or dried thyme, roughly chopped if needed Salt & pepper to taste 250g gnocchi 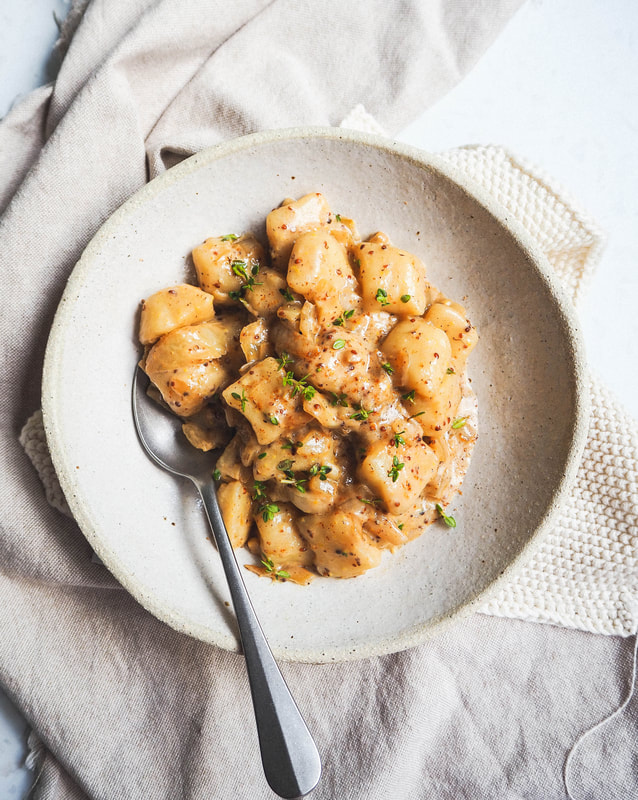 Method
Generously season a medium sized saucepan, filled halfway with water - bring to a boil. Meanwhile, add a dash of water or oil to a large frypan and set heat to medium. Add the onion, garlic, and sauté until the onion begins to go translucent - stirring throughout. Now stir in the tamari, coconut cream, seeded mustard, nutritional yeast, cayenne pepper, nutmeg and thyme - turn heat down to low. At this point add the gnocchi into the boiling water, and allow to cook until they begin to float - if using fresh gnocchi this is a matter of seconds. Once the gnocchi is floating, reserve ⅓ cup of the starchy cooking water, and drain the rest through a sieve. Add the gnocchi and the reserved pasta cooking water into the frypan, and allow to sauté until the sauce begins to coat the gnocchi and becomes thick. Season to taste and serve the creamy gnocchi between two bowls. Lastly garnishing with extra thyme, cayenne pepper, black pepper and a generous amount of freshly grated nutmeg. Serves 2 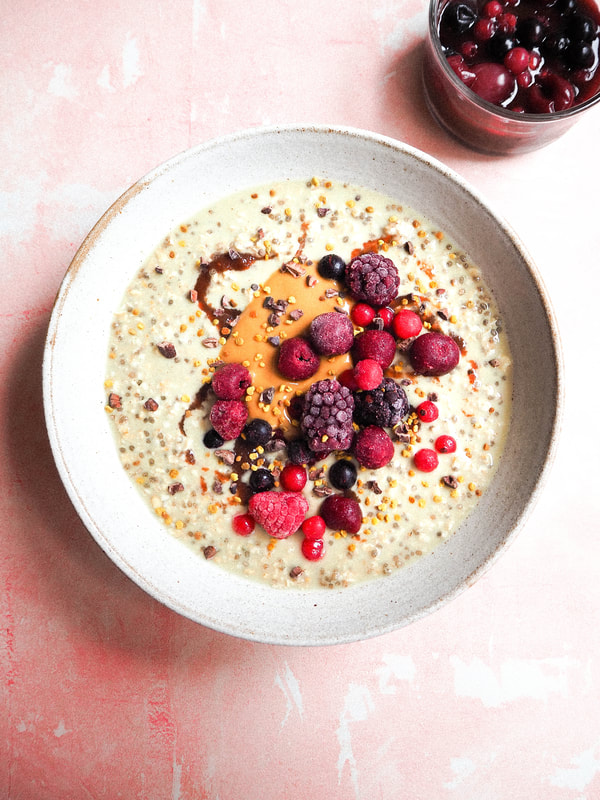 Peanut Butter & Jam is a match made in heaven, and when paired together, you simply can’t go wrong! Have you ever thought about adding matcha into the mix? ‘It’s a Matcha made in heaven!’ “Hmm, it could work, right?!” I thought also when creating this delicious breakfast idea - spiked with matcha to add a new depth of flavour and bonus energy boost. “Energy boost?” Matcha is a green tea powder, which contains caffeine. It's often considered a gentler form of coffee, as the energy released is long lasting, rather than coffee simultaneously giving you a boost. This recipe is an overnight oats creation, meaning it’s prepared the night before you wish to eat it. This is great if you’re often running to get out the door and when packed in a container or jar, it can easily be enjoyed on the bus or at your desk. Enjoy! Love Alex, Ballerina Bites. Xx PS: Be sure to tag me @ballerina_bites so I can see your wonderful recreations! 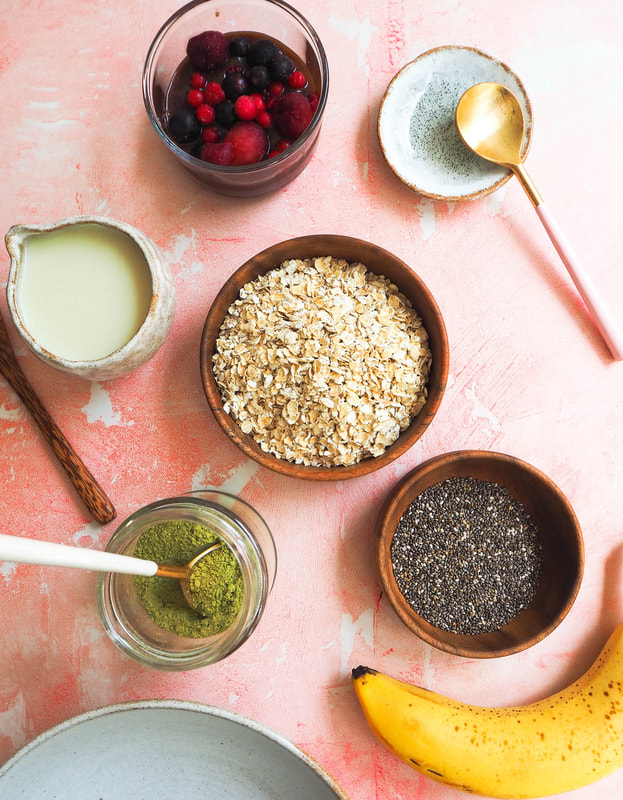 Ingredients ½ cup porridge oats 1 tsp chia seeds ½ tsp matcha powder (optional) ½ tsp ground cinnamon Pinch of salt 250ml milk of choice ¼ tsp vanilla extract 1- 2 tsp honey or liquid sweetener of choice 1 ripe banana, sliced into coins 1 tbsp natural peanut butter 1 tbsp jam of choice (I tend to go for one fruit sweetened rather than sweetened with sugar)  Method
The night before you wish to enjoy your overnight oats - combine the oats, chia seeds, matcha powder, cinnamon & salt in a bowl or jar. Stir until combined, before stirring in the milk, vanilla & honey. Refrigerate overnight. The following morning top your oats with banana coins and a dollop of peanut butter & jam. Feel free to add additional toppings like cacao nibs and fresh/ frozen berries. Serves 1 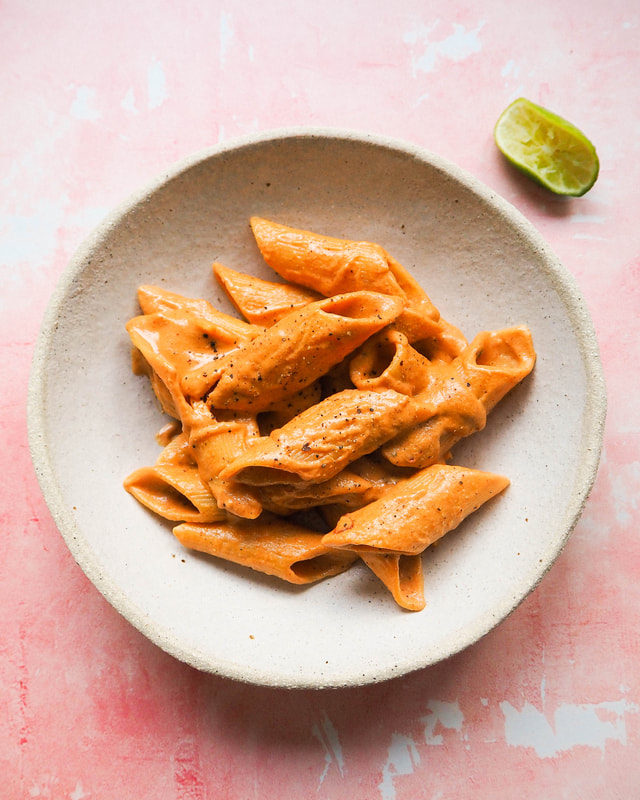 I wanted to bring you a pasta dish that was a little bit different, but everything a bowl of pasta should be - perfectly cooked al dente pasta, with a sensational rich sauce. My Smokey Pepper Pasta is just this, however, I do shy away from traditional Italian pasta ingredients. In this recipe, you’ll see tahini, tamari, maple syrup, nutritional yeast, lime juice and smoked paprika. I agree, the ingredients do sound a little bizarre, but trust me they all work together to create a truly delicious meal. See recipe video here. Enjoy! Love Alex. PS: Be sure to tag me @ballerina_bites on Instagram so I can see your recreations! Ingredients
200g pasta of choice 4 tbsp hulled tahini 2 tbsp tamari or soy sauce 2 tbsp nutritional yeast 2 tsp sesame oil 1 tsp maple syrup 1 tsp smoked paprika ⅛ tsp chilli flakes (or more if you like heat) A generous squeeze of lime juice 1 cup pasta cooking liquid Salt & pepper to taste Toasted pine nuts to garnish (optional) Method Fill a medium-sized saucepan halfway with water. Season generously with salt and bring to a boil. Once boiling, add the pasta and cook according to the packet instructions - you may like to drain the pasta a few minutes early to ensure it's al dente, as we will be cooking further in the sauce. Just before draining the cooked pasta, reserve 1 cup of the starchy pasta water. Drain the al dente pasta and add it back into the saucepan along with the remaining ingredients. Pour in the pasta water and stir on medium heat until thickened - this should only take a few minutes or so. Lastly season with salt and pepper to taste, and serve between two bowls. Garnish with more cracked black pepper and chilli flakes, if you wish. Serves 2  Whether you're someone who can't eat oats, choose to follow a paleo diet, or just looking to shake up your breakfast routine, my Orange & Cashew Grain Free Granola is a delicious addition. This recipe in particular is unlike other granola's, containing no added sugar or oil! The oil is substituted in this recipe by orange juice, which creates moistness and ensures the granola is delightfully crisp. The orange juice also adds the desirable zesty flavour and subtle sweetness. Raisins are added onced backed to add a natural sweetness also, but if they’re not to your liking, give mulberries a try. Enjoy! Love Alex, Ballerina Bites. Xx PS: Be sure to tag me @ballerina_bites so I can see your wonderful recreations! xx 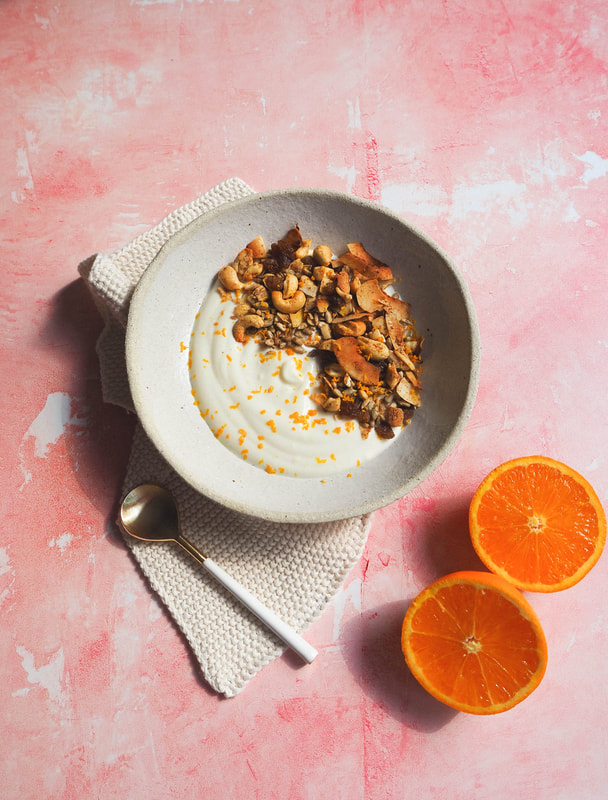 Ingredients 2 cups raw cashew nuts 1 cup sunflower seeds 1 cup coconut chips 1 tbsp ground cinnamon 1 tsp ground ginger ¼ tsp fine salt 1 large navel orange 1 cup raisins 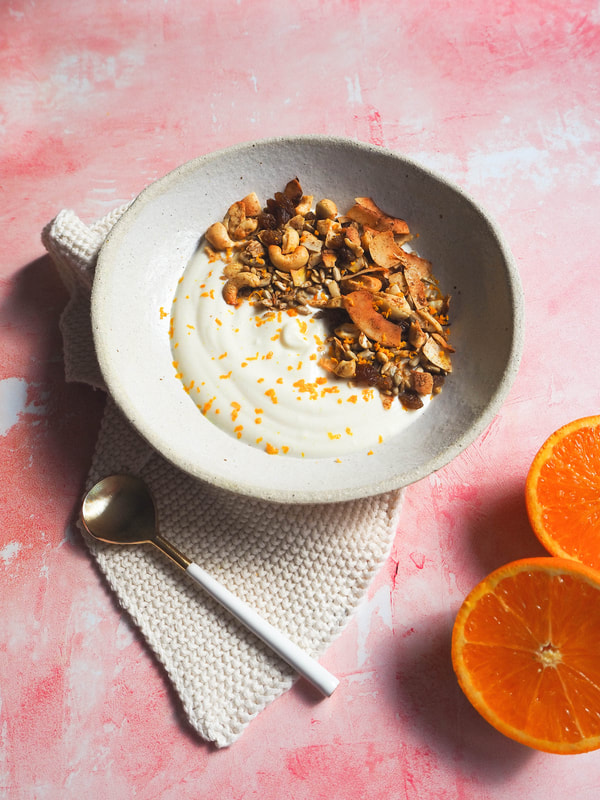 Method
Preheat the oven to 170°C and line a large tray with baking paper. To a food processor add the cashew nuts & sunflower seeds - pulse until the nuts and seeds are broken. Transfer to a large bowl along with the coconut chips, cinnamon, ginger & salt- stir until combined. Zest the orange and leave zest to one side. Slice the orange in half and squeeze out the juice into the bowl containing your granola. Stir again so everything is nicely coated in the juice. Spread the granola evenly over the lined tray and pop into the oven. Bake for 20- 30mins until golden, every 5 minutes tossing with a spoon. Be sure to watch the granola as it will easily catch. Once ready transfer the hot granola into a clean bowl. Now add the orange zest and raisins- stir until combined once more. Spread the granola back onto the tray to cool completely, before storing in an airtight container or jar. The granola will remain fresh for up to 2 weeks. Yields 750ml - 1L large jar 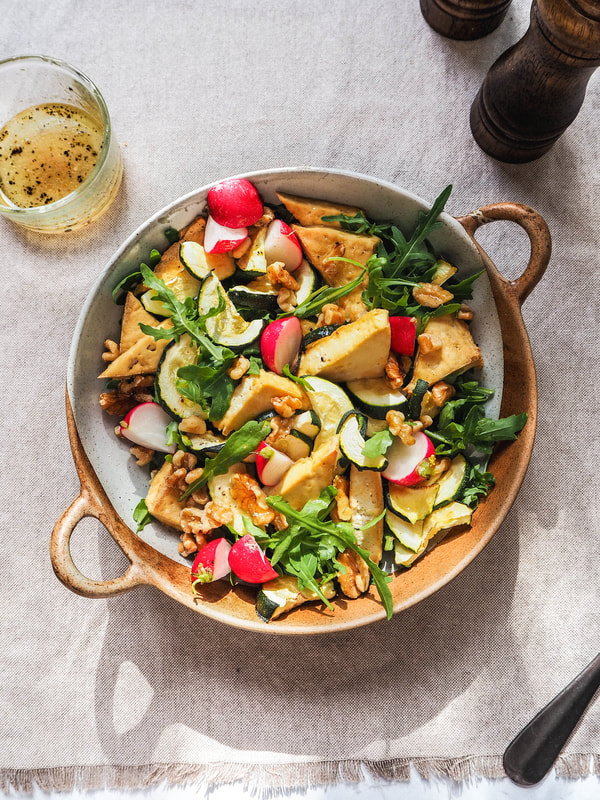 The weather is finally turning here in London, with comfortable temperatures 20 plus. Despite being in lockdown the sun’s light pouring through our windows seems to penetrate a sense of hope. With this very welcome change of weather, I’m also craving fresh salads again and my mind bubbling with new recipe ideas. Here's a simple salad recipe with tofu & walnuts providing protein & healthy fats. The rocket adds freshness, and the baked zucchini brings the salad into something hearty rather than just leaves. A sweet citrus dressing never lets you down, and tires the dish together, balancing the bitterness from the rocket & radish. Enjoy! Love Alex, Ballerina BItes. Xx PS: Be sure to tag me @ballerina_bites so I can see your wonderful recreations! 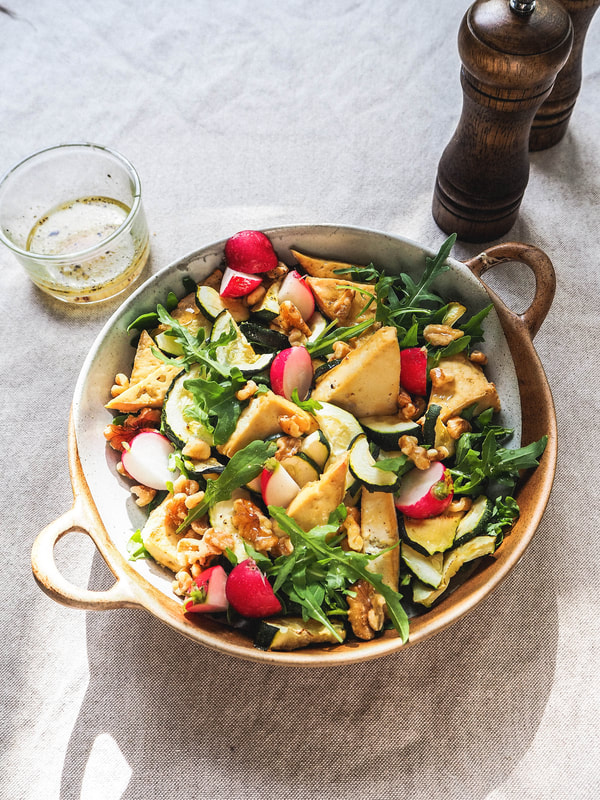 Ingredients
200g firm tofu 1 large zucchini A large handful of rocket 5 radishes A generous handful of walnuts Dressing Juice of ½ medium lemon 1 tsp brown rice syrup or honey 1 tsp olive oil Salt & Pepper to taste Method Preheat the oven to 180℃ and line a tray with baking paper. Slice the zucchini into half moons and the tofu into triangles, then place over the tray. Bake for 30mins or until golden. Meaning combine the dressing ingredients in a bowl. Taste, and if you prefer a sweeter dressing add more sweetener, or more tangy add more lemon juice. You can also leave it as is. :) To assemble the salad add the rocket as your base, then top with the baked zucchini & tofu. If need be, half or quarter your radishes and scatter over the salad too. Scatter over the walnuts, then lastly dress with the dressing. Serves 1 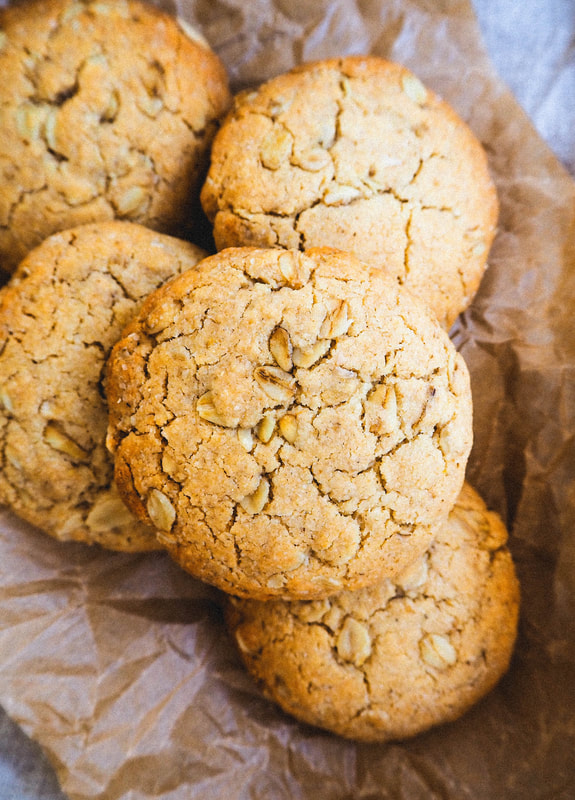 There are three biscuits I adore - Choc- Chip (obviously), Mint Slice (my weakness - google Arnott's Mint Slice) and ANZAC biscuits. What is an ANZAC Biscuit? "Well, you're sure in for something!" Firstly, ANZAC stands for Australian New Zealand Army Corps, and represents the men who fought during WWI. The biscuits were believed to be baked & sent by the men's significant other, as the ingredients when baked didn't spoil- butter, flour, sugar, golden syrup, oats & bicarb soda. However this proved to be untrue, and instead the biscuits were sold to community members to help raise funds for the soldiers. ~ The ANZAC is a rather humble biscuit and in other words, no need for embellishment! The combination of staple ingredients creates a truly wonderful cookie - well balanced and something no-one would complain about eating. As always, I've tweaked the recipe to be made using whole food ingredients, with coconut butter substituting the butter and also providing the coconut detail to the biscuit. Oat flour is used for the white flour sub, as this only seemed natural when oats are the star here. Enjoy! Love Alex, Ballerina Bites. Xx PS: Be sure to tag me at @ballerina_bites on Instagram so I can see your wonderful recreations! 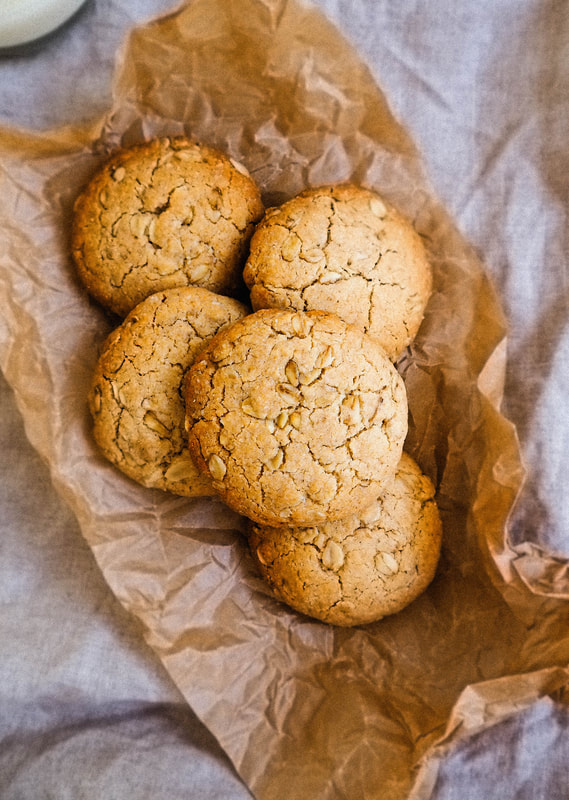 Ingredients ¾ cup + 1 heaping tbsp (200g) coconut butter* ⅓ cup (115g) brown rice syrup 1 cup (100g) oat flour** ½ cup (50g) rolled oats ½ tsp bicarb soda ¼ tsp fine salt  Method
Preheat the oven to 180°c and line a tray with baking paper. In a large bowl add the oat flour, rolled oats, bicarb soda and salt - combine using a whisk. Gently heat the coconut butter & brown rice syrup in a small saucepan on the stove-top. Once it's nicely melted together, pour over the dry ingredients. Using a spatula, mix until it resembles cookie dough. Spoon the dough into a heaping tablespoon worth, roll into a ball, before flatting and placing on your lined tray. Repeat the process until no dough remains. Bake for 10- 12mins, or until golden. Allow to cool for 5mins on the tray, before transferring to a wire rack to cool completely. Store the biscuits in an airtight container for up to a week. Makes 10 biscuits Notes *See here on how to make your own coconut butter ** To make oat flour, simply blend oats (porridge or rolled) in a NutriBullet or food processor until it resembles a fine meal. 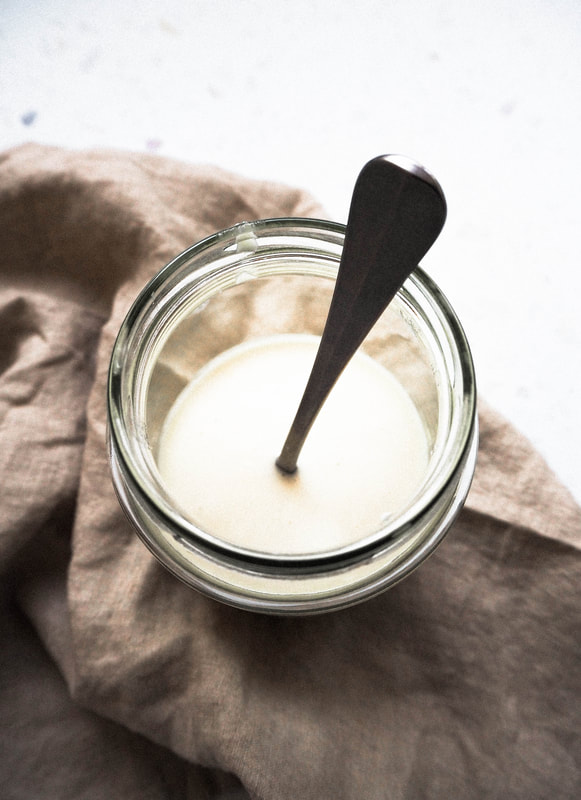 Throw-back to the time I lived in Germany and where I'd purchase coconut butter on the regular. It seems ridiculous to me now, why I'd purchase something that's so easy to recreate at home- not to mention cost effective?! ~ For this recipe you'll need 'one' ingredient - desiccated coconut. You simply blend the coconut until it resembles the consistency of melted chocolate. EASY! Other recipes on the blog also featuring coconut butter include - Berries & Cream Porridge, Matcha Vanilla Cupcakes & ANZAC Biscuits. Although I've only mentioned sweet treats, coconut butter works wonderfully in curries too. Enjoy! Love Alex, Ballerina Bites. Xx PS: Be sure to tag me @ballerina_bites on Instagram so I can see your wonderful recreations! Ingredients
3-4 cups unsweetened desiccated coconut Method In a food processor, add the coconut and begin to blend. Blend until the coconut is super smooth, like nut butter. Stop & scrape down the sides with a spatula throughout the process. Blending should take between 20- 30min. Have a taste midway through to see how the mouth feel is. It may look smooth, but be grainy! Store in an airtight jar - keeping in mind at room temperature the butter will be solid. To use simply melt in the oven. Yields 1x 500ml Jar. 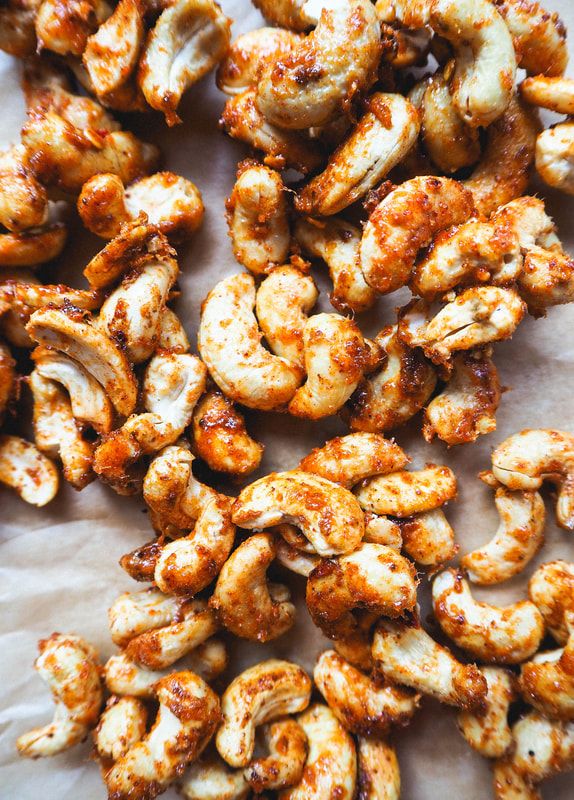 The Source Bulk Foods here in the UK (one of my favourite stores, I might add) have these chilli cashews that are simply incredible! They're not too spicy with a hint of sweetness and obviously salty. Despite Source's chilli cashew ingredients not being that bad, I'm however cracking down on my refined sugar consumption within my diet. I am no means against refined sugar as it does have a time and place - especially when you need a quick energy boost before/ during a performance, or even during our daily rigorous schedules. But for me, (I'm sure some of you can relate) processed sugar can have a negative effect on our bodies - like bloating & blemished skin. With that being said, I do love their chilli cashews and thought, "why miss out when I can recreate them at home?" ~ In my recipe I've chosen to use maple syrup. Yes maple syrup is still a form of sugar, but in comparison to white sugar it's collected from a whole natural source, provides vitamins & minerals and Low GI, meaning slow energy release. Maple syrup also adds a wonderful flavour to the cashews that I think is rather sensational. Enjoy! Love Alex, Ballerina Bites. Xx PS: Be sure to tag me @ballerina_bites on Instagram so I can see your wonderful recreations. 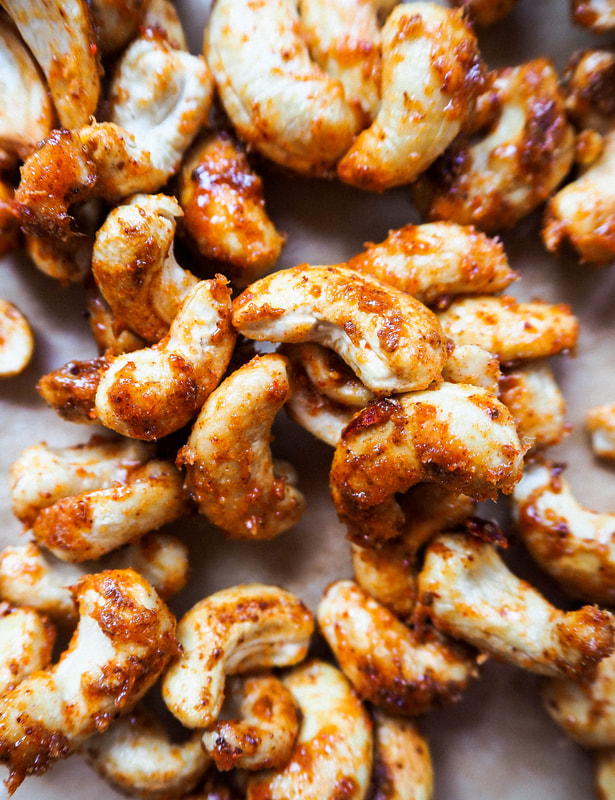 Ingredients
1 cup raw cashew nuts 1 ½ tbsp maple syrup 1 tsp corn flour ½ tsp salt ½ tsp garlic powder ½ tsp onion powder ¼ tsp smoked paprika ¼ tsp cayenne pepper ⅛ tsp sumac (adds a lemony flavour) ¼ tsp chilli flakes Method In a fry-pan add the cashew nuts and set heat to medium. Allow the nuts to toast, (stirring throughout) until they begin to colour. Keep an eye on them as they tend to burn quite quickly. Mine took around 10 minutes. Meanwhile in a small bowl add the spices. Stir and set aside until needed. Once the nuts are golden, add the maple syrup and spice mix. Stir, making sure everything is coated (I used a spatula) and toast for a further 1- 2mins. Spread the cashews out onto a lined surface; allow the nuts to cool before enjoying. Store in an airtight container at room temperature. Yields x1 500ml jar Of late I've been inspired by Indian cuisine after watching Pryia from Bon Appetit creating mouth watering dishes on BA's Youtube channel. With Pryia's ingrained-since-birth knowledge and her use of language, she makes Indian cooking somewhat more approachable and why I've decided to create more traditional Indian dishes at home. 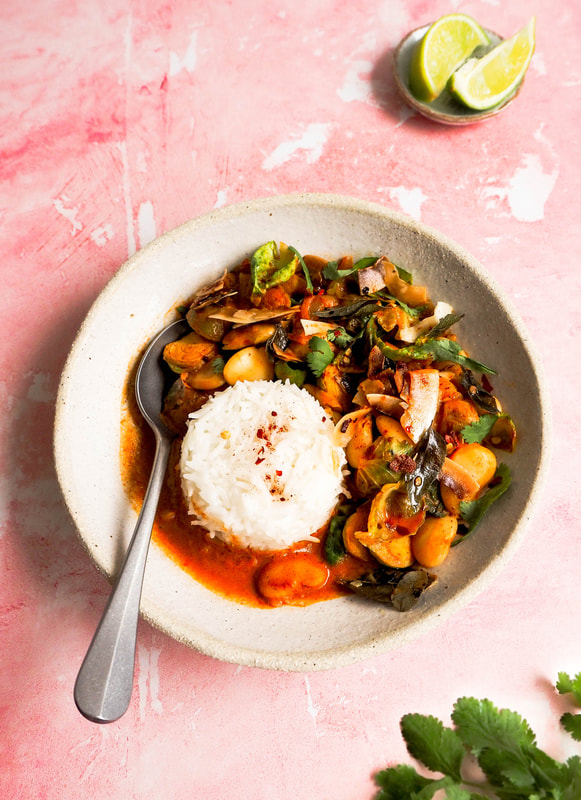 Here I have my version of Tikka Masala and although I've just mentioned "traditional," I've still managed to bend the rules. In my recipe I've used Brussel sprouts and butter beans as the 'bulking ingredients' in this dish, as they create a meaty heartiness; I simply love each to their own. If you're sceptical about the Brussel sprouts, don't be. They carry the curry sauce with such purpose with each crevice managing to be coated in the luscious sauce. On a more traditional side of things, I've used an array of ground spices and trusty curry powder, to really bump up the flavour. Something I love about Indian cooking, is they're not afraid to use ingredients such as spices quite intensely - bringing optimum favour even to the most simple of dishes. I've even managed to pike the dish with asafoetida! Asafoetida is used in many savoury dishes throughout India - mimicking onion, garlic, egg and even meat. It's commonly used in vegetarian dishes to add a bold depth of flavour. If you can find asafoetida, I highly recommend you give it a try, but be weary it doesn't have a pleasant smell. ;) Another widely used technique is 'chonk' - where you temper herbs & spices in oil to enhance their flavour and compliment the dish at hand. It's also wonderful at adding texture to a dish. Enjoy! Love Alex, Ballerina Bites. Xx PS: Be sure to tag me @ballerina_bites on Instagram so I can see your wonderful recreations! 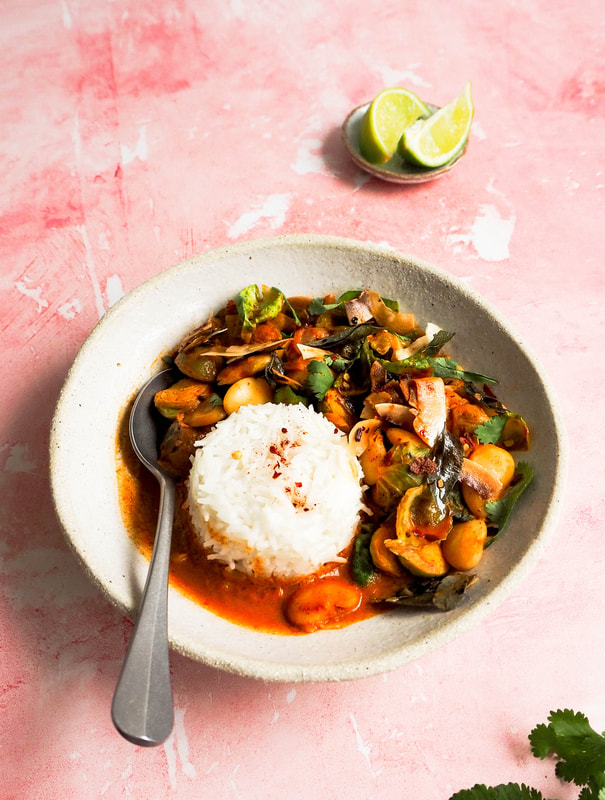 Ingredients
1 medium onion 2 garlic cloves, crushed 1 tbsp mild curry powder 1 tbsp smoked paprika ½ tsp garam masala ¼ - ½ tsp cayenne pepper ⅛ tsp asafoetida (I managed to find it at The Source Bulk Foods) 3 tbsp tomato paste 2 bay leaves 1x 400ml can coconut milk ½ can (200ml) water 400g Brussel sprouts, sliced in half 2 cans butter beans, drained and rinsed A handful of coriander, roughly chopped Wedges of lemon or tangy yoghurt to serve Chonk 3 tbsp coconut oil ⅓ cup dried curry leaves ⅓ cup coconut flakes ½ tsp chilli flakes Season with salt Method In a large saucepan, add a dash of water or oil. Set heat to medium- high. Slice the onion into thin half moon strips and add to the pan; stirring occasionally. Once the onion begins to go translucent, stir in the crushed garlic, curry powder, smoked paprika, cayenne pepper, asafoetida and tomato paste. Allow the spices to toast until they become fragrant - about 2mins. If you feel your pan becoming too dry, add a dash of water to deglaze the pan. Now add the bay leaves, coconut milk, water, Brussel sprouts & butter beans. Stir so everything is nicely amalgamated. Bring to a boil, before covering with a lid ajar and setting heat to low. Allow to simmer for 45mins, Meanwhile make the 'chonk' by adding all chonk ingredients into a small saucepan. Set heat to medium and allow to cook until the coconut chips begin to turn lightly golden. Be sure to take the chonk off heat a minute early, as it will continue to cook. Transfer to a bowl to stop the cooking process. Once the curry is ready - serve over rice with a sprinkle of the chonk. To freshen the dish, scatter over fresh coriander and a squeeze of lime juice or a dollop of tangy yoghurt. Serves 4-6 |
AuthorI'm passionate Ballerina that is dedicated to living a healthy lifestyle to ensure I perform at my best. 
|

